这个实验是用来帮助熟悉多线程的,要我们实现一个用户态线程。并使用多线程加速程序运行,实现同步屏障。
Uthread: switching between threads
实验要求设计用户态线程的上下文切换,实验提供了 user/uthread.c 和 user/uthread_switch.S 一些线程操作和切换的代码,这里缺少了创建线程和切换线程的代码需要完成。
用户态线程切换和内核的进程切换类似,都是通过先保存寄存器上下文,切换到调度线程,再由调度线程切换到另一线程。实验中要求完成的主要有以下几点:
- 确保线程从 thread_create 函数中传入的函数地址处开始执行,并为线程分配栈空间。
- thread_switch 需要保存之前被切换线程的寄存器,恢复要切换的线程的寄存器,并跳转到接下来需要切换的线程之前停止执行的位置恢复执行。
- 在 thread_schedule 中添加 thread_switch 调用。
实验中提出了一个问题是在 thread_switch 里为什么只需要保存 callee-saved 寄存器?
原因是 thread_swith 是函数调用,所以 caller-saved 寄存器已经被主调保存在自己的栈中了,函数返回时可以恢复。所以在 thread_switch 这里只需要保存 callee-saved 寄存器。
实现:
这里我们可以把内核进程切换的代码复制过来,为用户态 thread 增加一个 context 成员变量,其中包含了当前的返回地址和栈指针以及 callee-saved 寄存器。
 1
 2
 3
 4
 5
 6
 7
 8
 9
10
11
12
13
14
15
16
17
18
19
20
21
22
23
24
|
struct context {
  uint64 ra;
  uint64 sp;

  // callee-saved
  uint64 s0;
  uint64 s1;
  uint64 s2;
  uint64 s3;
  uint64 s4;
  uint64 s5;
  uint64 s6;
  uint64 s7;
  uint64 s8;
  uint64 s9;
  uint64 s10;
  uint64 s11;
};

struct thread {
  char       stack[STACK_SIZE]; /* the thread's stack */
  int        state;             /* FREE, RUNNING, RUNNABLE */
  struct context context;      // swtch() here to run process
};
|
在 thread_create 函数里为线程分配栈空间并设置函数返回地址为传入函数的地址。注意栈空间是向低地址增长的。
 1
 2
 3
 4
 5
 6
 7
 8
 9
10
11
12
13
|
void
thread_create(void (*func)())
{
  struct thread *t;

  for (t = all_thread; t < all_thread + MAX_THREAD; t++) {
    if (t->state == FREE) break;
  }
  t->state = RUNNABLE;
  // YOUR CODE HERE
  t->context.sp = (uint64)&t->stack[STACK_SIZE-1];
  t->context.ra = (uint64)func;
}
|
最后在 thread_schedule 中调用 thread_switch 切换线程,uthread_switch.S 的实现直接复制内核进程切换的代码即可,都是保存寄存器恢复寄存器的操作。
 1
 2
 3
 4
 5
 6
 7
 8
 9
10
11
|
//thread_schedule
if (current_thread != next_thread) {         /* switch threads?  */
    next_thread->state = RUNNING;
    t = current_thread;
    current_thread = next_thread;
    /* YOUR CODE HERE
     * Invoke thread_switch to switch from t to next_thread:
     * thread_switch(??, ??);
     */
    thread_switch((uint64)&t->context, (uint64)&next_thread->context);
  }
|
 1
 2
 3
 4
 5
 6
 7
 8
 9
10
11
12
13
14
15
16
17
18
19
20
21
22
23
24
25
26
27
28
29
30
31
32
33
34
35
36
37
38
39
40
41
|
//uthread_switch.S
	.text

	/*
         * save the old thread's registers,
         * restore the new thread's registers.
         */

	.globl thread_switch
thread_switch:
	/* YOUR CODE HERE */
	sd ra, 0(a0)
	sd sp, 8(a0)
	sd s0, 16(a0)
	sd s1, 24(a0)
	sd s2, 32(a0)
	sd s3, 40(a0)
	sd s4, 48(a0)
	sd s5, 56(a0)
	sd s6, 64(a0)
	sd s7, 72(a0)
	sd s8, 80(a0)
	sd s9, 88(a0)
	sd s10, 96(a0)
	sd s11, 104(a0)

	ld ra, 0(a1)
	ld sp, 8(a1)
	ld s0, 16(a1)
	ld s1, 24(a1)
	ld s2, 32(a1)
	ld s3, 40(a1)
	ld s4, 48(a1)
	ld s5, 56(a1)
	ld s6, 64(a1)
	ld s7, 72(a1)
	ld s8, 80(a1)
	ld s9, 88(a1)
	ld s10, 96(a1)
	ld s11, 104(a1)
	ret    /* return to ra */
|
Using threads
这里使用的是多线程操作哈希表的例子,要使用真实的 linux 或 macos 进行实验。首先我们先来看看实验给出的哈希表的基本结构。
1
2
3
4
5
6
|
struct entry {
  int key;
  int value;
  struct entry *next;
};
struct entry *table[NBUCKET];
|
可以看到是一个使用链表法的实现。
实验里有给出一个问题是在多线程操作这个哈希表的过程中会出现 key 丢失,让我们分析一下为什么会丢失?
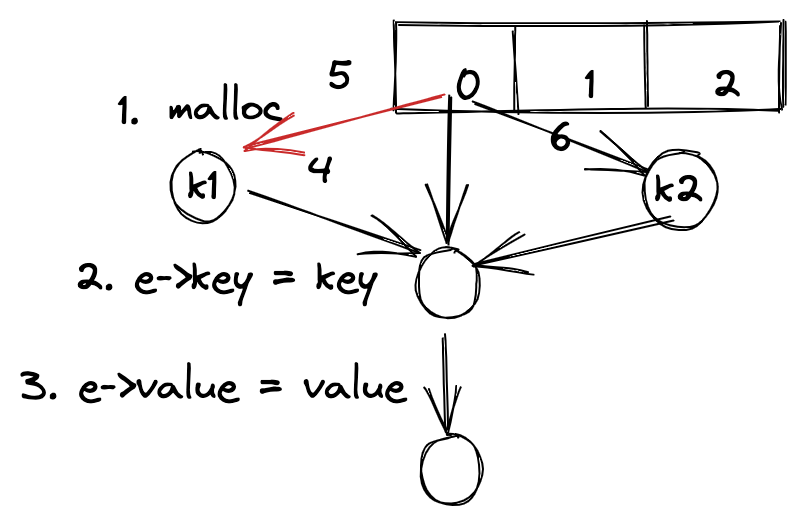
我们可以看一下插入到哈希表的方式,首先会对 key 哈希得到其属于哪个桶,假如两个 key:k1, k2 被分到了同一个桶,在一个桶中的插入就变成了单链表的插入,实验给出的链表插入方式是头插法,上图中标明了插入的步骤,如果插入 k1 和 k2 是并行的,在步骤 5, 6 完成之前其他的所有步骤都完成了,此时无论 5, 6 谁先执行,都有一个节点会丢失,因为 5, 6 的操作会相互覆盖,导致桶头节点的指向要么指向 k1 要么指向 k2,这样就会丢失一个节点。
避免出现 key 丢失的方法当然是加锁了,我们可以对哈希表的插入操作加互斥锁,并且根据上面的情况分析,只有在一个桶内的操作才会出现竞态条件,所以我们可以降低锁的粒度,每个桶都分配一把锁,只有在同一桶内的并发操作才加锁,不同桶间的并发无需加锁解锁。
实现:
 1
 2
 3
 4
 5
 6
 7
 8
 9
10
11
12
13
14
15
16
17
18
19
20
21
22
23
24
25
26
27
28
29
30
31
32
33
34
35
36
37
38
39
40
41
42
43
|
pthread_mutex_t locks[NBUCKET];            // declare a lock

static
void put(int key, int value)
{
  int i = key % NBUCKET;

  pthread_mutex_lock(&locks[i]);       // acquire lock
  // is the key already present?
  struct entry *e = 0;
  for (e = table[i]; e != 0; e = e->next) {
    if (e->key == key)
      break;
  }
  if(e){
    // update the existing key.
    e->value = value;
  } else {
    // the new is new.
    insert(key, value, &table[i], table[i]);
  }
  pthread_mutex_unlock(&locks[i]);     // release lock
}

static struct entry*
get(int key)
{
  int i = key % NBUCKET;


  pthread_mutex_lock(&locks[i]);       // acquire lock
  struct entry *e = 0;
  for (e = table[i]; e != 0; e = e->next) {
    if (e->key == key) break;
  }

  pthread_mutex_unlock(&locks[i]);     // release lock
  return e;
}
//main

for(int i = 0; i < NBUCKET; i++)
  pthread_mutex_init(&locks[i], NULL); // initialize the lock
|
Barrier
这里要我们利用 pthread 的并发原语实现同步屏障,首先看一下两个同步原语。
1
2
|
pthread_cond_wait(&cond, &mutex);  // go to sleep on cond, releasing lock mutex, acquiring upon wake up
pthread_cond_broadcast(&cond);     // wake up every thread sleeping on cond
|
实验的要求是利用两个并发原语实现同时有 n 个线程时所有线程才开始执行,否则 sleep 等待,并且可以一直执行多轮。
实现:
 1
 2
 3
 4
 5
 6
 7
 8
 9
10
11
12
13
14
15
16
17
18
19
|
static void
barrier()
{
  // YOUR CODE HERE
  //
  // Block until all threads have called barrier() and
  // then increment bstate.round.
  //
  pthread_mutex_lock(&bstate.barrier_mutex); // 首先获取互斥锁,保护共享变量
  bstate.nthread++; // 增加线程计数器
  if (bstate.nthread != nthread) { // 未满足条件 wait
    pthread_cond_wait(&bstate.barrier_cond, &bstate.barrier_mutex);
  } else { // 满足条件唤醒所有线程,并进入下一轮
    bstate.round++;
    bstate.nthread = 0;
    pthread_cond_broadcast(&bstate.barrier_cond);
  }
  pthread_mutex_unlock(&bstate.barrier_mutex); // 解锁互斥锁
}
|
总结
这个实验通过实现用户态线程,使用多线程加速程序,使用线程同步原语等方式让我们熟悉线程的基本使用。实验都是一些工作都会用到的经典场景,做完感觉对线程,并行等概念的了解更加深刻了一些。
Author
Hao
LastMod
2022-02-03
License
本文采用知识共享署名-非商业性使用 4.0 国际许可协议进行许可